
Late Summer Seed Collection from Meadow Plants
Why Late Summer Is the Golden Window
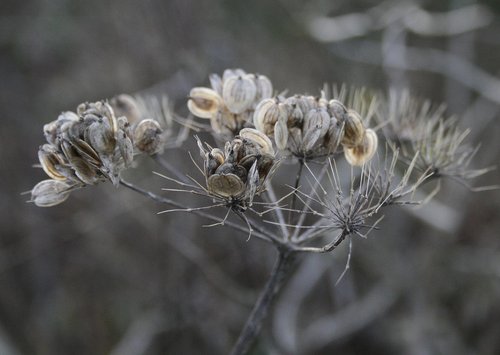
There is a moment in late August and early September when a wildflower meadow seems to hold its breath. The ox-eye daisies have finished, the knapweed is turning brown at the edges, and the seed heads are beginning to rattle in the breeze. This is your window. Collect too early and the seed will be green, hollow and useless; leave it too long and the birds, the wind and the first autumn rains will strip the meadow before you get there.
For anyone designing a sustainable British garden, this is one of the most rewarding tasks of the year. A meadow that self-seeds is a meadow that looks after itself, but a little intervention now means you can spread your best plants into new corners, share seed with neighbours, and build a stock that is genuinely suited to your soil and microclimate. It is slow gardening at its finest.
Reading the Signs of Ripe Seed
The trick is learning to judge ripeness by eye and by touch rather than by the calendar. Different species ripen at different rates, and a hot dry August will push everything forward by a fortnight compared with a cool damp one.
- Colour change: Seed heads shift from green to brown, straw or grey. Yellow rattle turns a deep chocolate brown; field scabious goes a papery beige.
- The rattle test: Cup a seed head in your hand and shake it gently. If you hear a faint dry rustle, the seed is loose and ready.
- The tap method: Hold a stem over a paper bag and tap it sharply. Ripe seed will fall freely; unripe seed clings on.
- Seed colour: Check a few individual seeds. They should be firm and fully coloured, not soft, milky or pale.
It helps to walk the meadow every few days from mid-August onwards with a bag and a pair of secateurs, taking only what is ready rather than trying to harvest everything in one session. Meadows reward this kind of patient, piecemeal attention.
Collecting on a Dry Day
Moisture is the enemy of stored seed. Damp seed goes mouldy in the bag within days, so choose a dry, still morning after the dew has lifted. Mid-morning to early afternoon is ideal: the sun has dried the stems but the heat has not yet made the seed heads brittle and explosive.
Take a paper bag for each species, plus a pencil, some small elastic bands, and a pair of sharp scissors or secateurs. Paper is essential. Plastic bags trap moisture and sweat, and you will open them a week later to find a soggy, smelly mess. Paper lets the seed breathe while it finishes drying.
For most meadow plants, snip the whole stem a few inches below the seed head and drop it head-first into the bag. For species that shatter easily, such as yellow rattle or poppies, hold the bag underneath and tap the stem so the seed falls straight in. Handle the bags gently, keep them out of direct sun, and never leave them in a hot car.
Labelling Properly Saves You Later
Every winter, gardeners everywhere open a mystery envelope of brown flecks and wonder what on earth they collected. A label written now takes ten seconds and saves months of guesswork. Write the species name if you know it, or a clear description if you do not, along with the date and location.
- Species: Common name is fine, but botanical name is better if you have it.
- Date: Useful for judging viability and germination timing next spring.
- Place: "Front meadow, clay soil" tells you far more than you think.
- Notes: Wet summer, heavy shade, tall plants, anything that might explain next year's results.
Write on the outside of the bag in pencil, which does not run or fade, and slip a second paper label inside as a backup. If you are collecting from several plants of the same species with noticeably different traits, keep them separate. That taller, darker knapweed might be worth propagating on purpose.
Drying, Storing and Sowing On
Back home, spread the contents of each bag on a sheet of newspaper or a tray in a cool, airy room away from direct sunlight. Leave them for one to two weeks until the stems snap cleanly and the seed feels bone dry. Then rub the seed heads between your fingers or gently crush them to release the seed, and winnow away the chaff by pouring from one bowl to another in a light breeze or in front of a fan on its lowest setting.
Store the cleaned seed in labelled paper envelopes or small paper bags inside an airtight tin. Keep the tin in a cool, dark, dry place: an unheated cupboard, a shed that does not get damp, or the bottom of the fridge for longer-term storage. Label the tin as well as the envelopes.
Most British meadow wildflowers need a period of cold to break dormancy, so autumn sowing straight into prepared ground is often the simplest route. Otherwise, sow in early spring after the worst of the frost, or mix your seed with damp sand and keep it in the fridge for six weeks before sowing. Either way, you are carrying the meadow forward into another year, one paper bag at a time.
tag: Wildflower Meadows

Oliver Pemberton Author
Leave gaps in fences, create log piles, and avoid pesticides to make your meadow garden safer for hedgehogs and other creatures.
YOU MAY ALSO LIKE
Supporting Hedgehogs and Small Garden Wildlife
Jun 19
10Start with careful ground preparation, choose a suitable native seed mix, and sow thinly in autumn or spring for reliable germination.
read more
How to Create a Wildflower Meadow from Seed
Sep 25
10Fine grasses such as sheep fescue and crested dogstail support wildflowers without overwhelming them, creating structure and texture.
read moreWildflower Meadows
-

ERRIC CATONA
Light mowing, removing early weeds, and checking drainage help your meadow wake up without damaging delicate emerging seedlings.
May 19, 2016 at 5.12 pm
Reply
ERRIC CATONA
This native annual weakens competitive grasses, giving wildflowers more room to establish in established meadows and new sowings.
May 19, 2016 at 5.12 pm
Reply -
ERRIC CATONA
Cut once after seed set, remove clippings to lower fertility, and leave areas of uncut stems for overwintering insects and wildlife.
May 19, 2016 at 5.12 pm
Reply
Garden Design
Your email address will not be published.